Bookings
Microsoft Bookings makes scheduling and managing appointments a breeze. It helps you schedule and manage appointments with your customers, clients, or colleagues. Whether you need to book time to meet people or set aside time for different meetings, Bookings makes it easy and convenient for both you and your attendees. Bookings includes a web-based booking page, which integrates with Outlook to optimize your calendar and give your customers the flexibility to book a time that works best for them. Email and SMS text notifications reduce no-shows and enhance customer satisfaction. Your organization saves time with a reduction in repetitive scheduling tasks. With built-in flexibility and ability to customize, Bookings can be designed to fit the situation and needs of many different parts of an organization.
Note
The Bookings calendar is a mailbox in Exchange Online.
Microsoft Bookings for Virtual Meetings
Use Bookings to make your organization's meetings virtual with online meetings via Microsoft Teams and Skype for Business. Each appointment booked as an online meeting creates a unique meeting link that is sent to attendees so they can join via a web browser, phone dial-in, or the Skype or Teams app. Bookings is also available as an app in Teams, which allows you to create Booking pages, declare your availability, add team members, and both schedule new and manage existing appointments.
Personal Bookings
Personal Bookings is how you manage your own appointment timeslots. It allows you to easily configure and share your availability with your customers, clients, or colleagues. You can be in charge of your own time and avoid the back and forth of scheduling. You can also set aside time for specific activities by creating meeting types. Once you create a personal booking page, you can share a link with anyone who can then see your availability and easily schedule a time when you're free and convenient for them.
Shared Bookings
Shared bookings are booking pages that you create and manage for your team. They allow you to invite your team members to let your customers book time with you and your team.
It's made up of these components:
A booking page where your customers and clients can schedule appointments with the staff members who should provide the service or run the appointment. This web-based booking page can be shared via a direct link, your Facebook page, and even through link embedding within your website.
A web app that contains a set of web-based, business-facing pages where Booking page owners and administrators within an organization can define appointment types and details, manage staff schedules and availability, set business hours, and customize how appointments are scheduled. These pages allow for versatility and the ability to customize a booking page to fit the diverse needs of the person or organization.
Bookings Data and Compliance
All Bookings data is stored within the Microsoft 365 platform and in Exchange Online. Bookings follows all data storage policies that are set by Microsoft, which are the same policies that all Microsoft 365 apps follow. Bookings uses shared mailboxes in Exchange to store customer, staff, service, and appointment details. Compliance policies for shared mailboxes in Exchange also apply for Bookings mailboxes. All customer data (including information provided by customers when booking) is captured in Bookings and is stored within the app, thus it's stored within Exchange Online.
Create a Booking
- In Microsoft 365, select the App launcher, and then select Bookings.
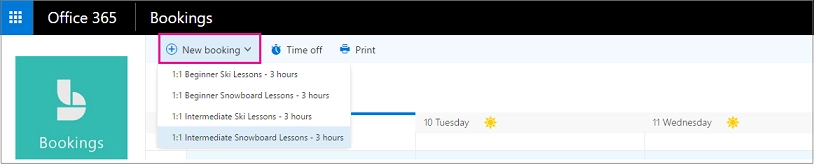
- In the navigation pane, select Calendar → New booking.
- Select the service to be provided. See Define your service offerings in Microsoft Bookings for service setup instructions.
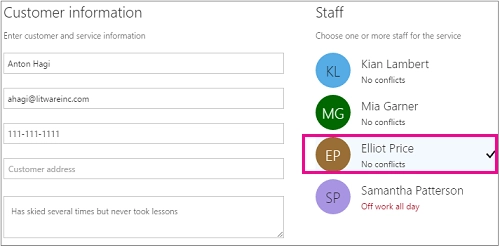
- Enter the customer information, including name, email address, phone number, and other relevant details.
- Select the staff member to provide the service. The list of staff members shown is based on what you set up on the services page.
- Enter the service details, including date, time, location, and other relevant information. Once you enter a valid email address for the customer, you'll see a note that a confirmation will be sent to the customer. The customer confirmation includes an attachment for them to add to their calendar. Selected staff members will also receive meeting invitations with the appointment information so they can add it to their personal calendars.
- Select Add an email reminder.
- Specify when the reminder should be sent, where it should be sent (Customer, Staff, All attendees), and what the reminder message should be.
- Select Create booking.
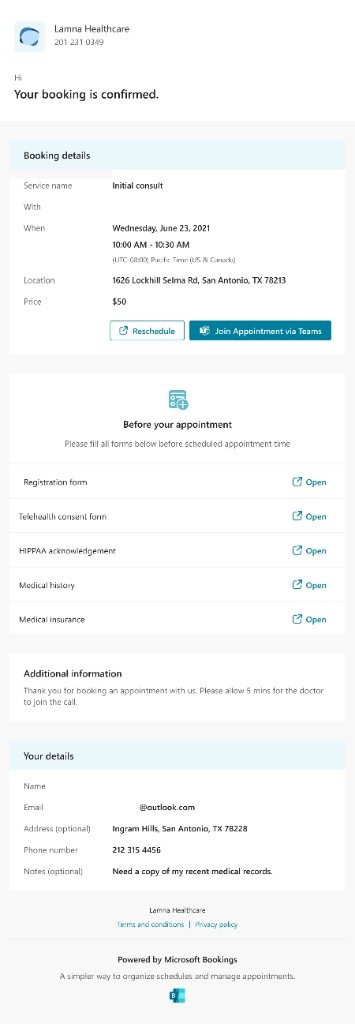
Here's an example of the confirmation email your customer will receive: